A great way to get your course off on the right foot is to produce a course introduction video. New tools from Adobe and others make it as easy or as complex a process as you want it to be. From a simple course overview to a detailed demonstration to an integrated learning activity, there are many ways you can produce a video introduction to your course.
Why a video? How many YouTube videos have you watched this week? Cooking or craft videos on Facebook? Instagram videos? We are a visual society, so let's make use of that in our online classes. A course introduction video is a simple way to get started.
Producing your own video also personalizes your online course. In the classroom, students see you, but in an online course, particularly one that relies heavily on auto-graded publisher content, students can lose sight of the fact that there is an instructor. Producing a course introduction video is a good way for you to remind them that you are there to help, even virtually.
Course Overview Video
A course overview video is a short, 2-3 minute video that tells the students what to expect in the course. You should include content like the following:
Spark Video is a simple, free way to take still images, combine them with icons and text, add your narration, and quickly produce a simple video introduction to your course. In addition to the web site, you can use the Spark Video app on your phone, and upload your finished video to YouTube. I explain how to use Spark Video in this blog post, or you can take a self-paced workshop from Adobe.
In this video, I combined public domain images with screen captures from Blackboard Learn to show students what to expect in my course. I include a link to this YouTube video as an announcement available on the first day of the class.
Course Tour Video
If you are feeling a little more adventurous, you can do a video tour of your course. A video tour is more specific than an overview and involves using screen recording software. You use the student preview feature in Learn to go through your course as a students, and explain what they need to do to complete the course. This is particularly useful for courses with different types of assignments or that use publisher web sites for some work and Learn for other work.
Course tours will be longer than course introductions, because you are giving more specific, detailed information. They should still be no longer than the 5-7 minute range to increase the likelihood that students will watch the entire video. But remember, this is just a tour; you want to give details on WHAT to do to complete the course, not HOW to do it. You can create demonstration videos for that.
Here is my Course Tour for PSY 102:
For this video, I used Screencast-o-matic. This site has a free version, where you are limited to videos no longer than 15-minutes (if you are making videos that long, you need to shorten them) with a watermark, or a paid version with no time limit and no watermark. I opted for the paid version at $10 a year, because I do a lot of screencasting and I wanted to not have the watermark, but the free version is good if you are only doing a few.
After I made the screencast, I saved it to my computer, and then edited it with Adobe Premiere Pro. I was able to cut out unneeded parts and add titles and overlays. Again, we have this for free on campus, but you can get a low-cost subscription license through the college for all of the Adobe Creative Cloud products for use at home. Adobe offers many courses to learn how to use their software; I've taken several, and that's how I learned to use Premiere Pro. Here are a couple of courses you can take to Learn about Premiere Pro:
You could also use Adobe Premiere Clip on your phone or tablet. Clip is a simple video editor that allows you to cut out unneeded part and add title frames to your video. However, you cannot add overlays.
Here's a nice introduction to Adobe Premiere Clip:
Finally, if you just want to edit out the unneeded part, you can use YouTube's video editing features. I explain how to do that in this blog post.
Course Demonstration Video
While Blackboard provides a lot of good videos for students to learn how to use Learn, they are pretty general in nature. Sometimes students benefit from more specific information about how to complete assignments in your course. You can use screencasting to tell them how to use the Blackboard Learn tool to complete the specific assignment. Here is a video where I tell students how to complete their weekly In the News blog:
This is much more specific to their assignment in my course than the Blackboard video about the Blog tool. I also created videos about how to comment on other blog postings, how the blogs are graded, how to take their weekly quizzes, and how to submit critical thinking assignments. I put links to these videos in my Getting Started area in my course, as you can see from my Course Tour video.
You can create these the same way you create a course tour, but they should be shorter in length, no more than 4-5 minutes. You are teaching student how to do one thing, and one thing only. Keeping the video short increases the chances of them watching the whole video and going back to rewatch it if they need to.
Three short videos are better than one long one. In the case of my blog tutorials, I did one on how to submit the blog, one on how to comment on other blogs, and one on the rubric I use to grade them. If strudents just need to find out how to comment on other blogs or have a question about grading, it is easier for them to find that information directly, rather than trying to fast-forwar through a 10-minute video that covers things they don't need to know right away.
Course Introduction Learning Activity
If you want to increase the likelihood of your students watching your videos, try incorporating them into a learning activity. You could just add a short quiz in Learn about the content of the video, or use Office Mix to integrate your video into a narrated PowerPoint with embedded questions. Office Mix is a free add-on to PowerPoint that helps you create more interactive presentations. Although Mix is very easy to use, the Office Mix site has some very good tutorials to learn to details.
Here is my Mix I created using the Course tour video for PSY 102
By watching these videos and completing the learning activity students will have a much better understanding of what is required of them to complete my course. Although it does take some time to produce these videos (it took me about a day to make all of my videos and to create my Mix), you can use them over and over. In fact, I can use many of these videos from one course to another, and once I've done one course tour, to second and third become easier.
I hope you'll consider adding an introductory video to your courses, whether it is a simple overview, a more in depth tour, or a full blown learning activity. Any one of these will help your learners understand how to complete your courses successfully, ensuring that their grades reflect their understanding of the content of the course, not the mechanics of learning online.
If you google "ways to engage online students," you'll come up with all sorts of lists. Well, here's another list, of five things I have tried and from which I have seen positive results over the years.
Most people think of communication as just email and discussions, but there are more options than that. These are ways you can engage different channels of communication, including audio and visual, with individual students or the entire class.
Announcements
I make the Announcements tool in Blackboard the Course Home Page. I can "pre-post" announcements that become available automatically as each week in the course starts, but I also post announcements about things students need to know right away. This makes the home page dynamic instead of static, and so students see something new at least once a week when they log on to their course.
Video Updates
Using my cell phone, YouTube, and a custom thumbnail, I post video updates periodically in each of my courses. I use these to clarify a problem several students had, provide some positive reinforcement for a job well done - or for just making it through another week - or draw attention to something interesting I read or saw that week related to the class. These are useful for when I need to spend a little more time explaining something than I can spend in a paragraph or two in a written announcement. I usually post them as announcements, but I could also post them as items in the next weeks learning activities.
Audio Feedback
If you have an iPad or other tablet device, you can use the BB Grader app to grade Assignments. While you can give the usual written feedback on those, you can also give audio feedback for each student. (You can also do video feedback, but considering what I look like when I'm grading on the weekend, I'll stick to audio). It might be easier to just tell them how to improve their work instead of trying to write it.
For now, you can only grade Assignments with BB Grader. You can't grade tests, discussions, blogs, or any other tool you use and to which you assign a grade, but improvements to that app are in the works. If you use Assignments in Learn, though, this is a useful tool to give individual and timely feedback to students and keep them engaged in their learning.
Making course content relevant to students increases engagement, because they can see real-world value for what they are learning. If you can provide application to their future job or to their life, they will be more likely to engage in their learning.
Current News Announcements
Since I teach astronomy and psychology, I follow a number of Twitter or Facebook accounts the post current news articles in the field. When I find an article that is relevant to the course content, I will post a link to it as an announcement. Sometimes it will be just an interesting article about a general topic in the course, but once in a while, I find something relevant to what they are learning that week. For example, the week my astronomy student were learning about the Earth-Moon system, a link to a new theory (or a revised theory, really) about the formation of the Moon came across my Twitter feed. Since I have a learning activity that includes an explanation of the low energy impact theory, I posted this article to give them the most current information. That shows them that what they are learning about is what is currently being researched by astronomers.
Weekly Discussions
The Discussion tool in Learn has changed, so I've added weekly discussions back into my redesign of my Descriptive Astronomy class (I will add them back into the Psychology course next year). Again, with discussions, I can pick a current topic, direct students to come information about the topic, and have them discuss the issues around the topic.
In this case, they were learning about telescopes. One important point was that a larger aperture means a larger light gathering ability, which means being able to see more distant objects. A 30-meter telescope, larger than any currently in use, is planned for Hawaii's Mauna Kea site. However, construction was halted by protests from native Hawaiians who claimed it was being built on sacred lands. This was fodder for a great discussion about balancing science and religion, with students adding links to article they found on the topic.
In the News Blog
I have used this assignment for a few years now, and I have actually gotten more positive comments from students on this assignment than on any other one I use. Each week, I give students a topic relevant to the course content for the week, and they need to find a news article about the topic. I give them acceptable sites, and they have a specific format for their blog. They must also read and comment on at least two blog postings from their classmates. This assignment allows them to pick an article relevant to their interests, and shows them how what they are learning in class can be applied to the "real world;" it is not just some stuff in a textbook.
A student in my physical science class told me she liked that class, because I had them do things. They may have been silly things like wadding up a piece of paper and dropping it along with a book or putting a blown-up balloon in the freezer, but they had to actually do something to apply what they were learning. "Multiple choice questions are boring," she said.
Simulations
I use a lot of simulations in my online courses from virtual labs in Descriptive Astronomy to Application Activities in Psychology of the Person and the Workplace. I also use them to create narrated videos to explain certain concepts in the courses.
Video-based Critical Thinking Activities
I try to find videos that apply what students learn in class. That might be a video interview with a schizophrenic or a funny YouTube like this one where a student demonstates using classical conditioning to train his roommate to flinch at the sound of the easy button.
After watching the videos, students must answer questions related to the content in which they apply what they are learning that week. These are higher level essay or shart answer questions that reguire them to think about what they are learning and how it applies to what they are watching. In addition to giving them visual learning opportunities, these test those all import higher order objectives.
Office Mix
I am a Mixoholic. I need to do an entire blog on the wonder of Mix. Mix is an add-on to Powerpoint 2013 or above that allows you to incorporate a variety of content sources into one PowerPOitn deck, add in questions to immediately quiz students on their understanding, AND incorporate it into Blackboard, so their scores on the questions go right into your Blackboard Grade Center.
For examples, I did a Mix about how telescopes work. I could very easily add images from NASA, a clip from a YouTube explaining the purpose of telescopes, my own narration explaining how different types of telescopes work, animations explaining special types of telescopes - all interspersed with questions to test student understanding of concepts. Students can also go back through the Mix to review anything they didn't understand, and when they are done, turn in their work for credit.
We are always willing to tell students what they are doing wrong, but how often do we tell them what they are doing right? Educational psychologists will tell you reinforcement is always more effective than punishment, so if you want to encourage appropriate behavior in your courses (like getting work done on time or exhibiting more effort than just the minimum) try positive reinforcement.
Positive Feedback
One of the advantages of using written assignments, blogs, and discussions instead of just objective quizzes is I can see more of the work students are doing. I can see where they've made a special effort or gone the extra mile. I can reward that by giving them positive feedback in addition to a grade. For example, on this blog, I told the student why I thought the article he found was unysyally interesting and why. That increases the likelihood that he will continue to extend that extra effort in the future. Students are also required to post a question they still have after reading the article they use for their blog, and I use the feedback to answer the best questions. Again, this not only increase teacher-student interaction, but it increases the likelihood that students will ask thoughtful questions, if they know I will make the effort to answer them.
Achievements
Blackboard has a great feature called achievements. Achievements are like badges that you can award for achieving certain goals in a course. I set an achievement for every week that the student earns (and it becomes visible to them) after they have completed all of the work for that week. It does not need to be graded; they just need to have an attempt recorded in the gradebook. It's a good visual reminder to students for whether they still have additional work to do or not. If they see the achievement, they're done, but if not, they need to do something else.
I also use the achievement for bonus points. Again, as positive reinforcement, I award bonus points for completing work on time rather than deducting points for work that is late. Students are more likely to work harder to earn something than to avoid losing something - reinforcement is always more effective than punishment.
Progress Emails
In the past, I have always sent out emails periodically reminding students what work they are missing and when the date by which they need to make the work up. Lately I have also started to send out emails telling students who have completed all the work and who are doing well in the course. These are just quick notes to let them know they are doing a good job and to keep up the good work! Again, we always seem to worry about the ones who aren't doing well that we don't make the effort to reinforce the ones who are. That little message two-to three times a semester might be just enough to keep them motivated.
When students see you in a classroom every week, they get a feel for who you are. They may be more likely to ask for questions or for help. But when you are behind a computer screen, you are anonymous, and it is more difficult for them to remember there is someone there to help them.
"Selfie Videos"
I do these little videos of just me talking. That's it, nothing fancy. I'll do them on my cell phone or using the webcam on my laptop, upload them to YouTube, add a custom thumbnail, and post them as announcements. These are usually the video updates mentioned above, but I might also do a video about something I read or heard relevant to the class. They key point, though, is that they put a face to the person teaching the course. They get to see me and hear me, just like they would in a classroom.
When I've mentioned these to people, their first reaction is generally, "I hate how I look/sound in recordings!" You don't really look any different in the front of a classroom; you just aren't used to seeing yourself or hearing yourself so it seems odd at first. However, the more of these you do, the more comfortable you become, and the more your students will understand they aren't alone in the course. This will increase the likelihood of them seeking ehlp when they need it.
Personal Information
You don't have to reveal every intimate detail of your life, but adding a little tidbit about yourself once in a while humanizes the computer-based learning experience. In this case, a student mentioned being a Dr. Who fan in their introductory discussion. I replied by mentioning the "Tardis" hat (Dr. Who travels around in the Tardis, a blue British police box) I knitted for my nephew's wife. I've also had my cats make appearances in my selfie videos, or I've talked about how nice the weather is. Nothing major, but it does form a little bond between me and my online students.
Progress Emails
I send out emails to students periodically to give them an idea of how they are doign in the course. Generally I try to send them after the first week, after the thrid week, right before the midterm, and before the final withdrawal date.
These emails outline exactly what work the student is missing, if any, what work they need to do better on (if they aren't commenting on blogs for example, or if they aren't submitting their assignments correctly). I will tell them when they need to get the work submitted, or ask them if they need some extra help. Again, it is just another way to make that person connection with students and let them know they have someone they can turn to for extra help.
Those are just a few ways I try to increase student engagement in my online courses. I didn't start doing these all at once, but I developed them over the years, along with others, and kept the ones that worked and changed the ones that didn't. I hope you give one or two of these a try yourself.
Now that you have your engaging, active PowerPoint, you are ready to actually narrate your PowerPoint and save it as a video you can use in your online course. Well, almost...I do have a few more pointers for you.
Tips for an Engaging Narration
OK, maybe not that animated...and I don't mean just visually. Make sure when you record your narration you put some animation in your voice as well. You should sound just a little bit goofy. It will take some getting used to, but remember that anything that changes catches someone's attention. That applies to changing the inflection of your voice as well as motion in your video. Some people suggest that you speak slower than normal, but I find that sounds forced, and you tend to lose the inflection you need to sound animated.
I do recommend writing a script, at least until you get used to recording your voice. You can put the script in the notes area of your PowerPoint slide and print out the notes to use while you narrate. Rehearse once or twice to get comfortable with using a script and to make any last minute changes, as well as to check your animations in PowerPoint.
While computers often have microphones built in, I recommend using a separate USB mike or even a microphone/headphones head set. You will get better sound quality that way, since the mike will be the correct distance for good sound quality, and it will be better able to filter out extraneous noises. Speaking of extraneous noises, if your mouse has a wheel on it, use that to transition your animations and slide changes. Using the spacebar on your keyboard or even clicking the left mouse button can make an audible click on your narration.
One thing you should know is PowerPoint records each narration for each slide separately, so you can't talk over the transition from one slide to another. You can talk over animations within slides, but not when you move from one slide to the next. If you do, you will hear a break in your narration as you move from slide to slide. To prevent that, stop talking before you transition to the next slide, pause just long enough to know you paused, and then move to the next slide. You'll avoid any loss of words that way.
Narrating in PowerPoint 2010
Now you're ready to narrate. This is the easy part!
Everything you need to create your narration is located on the Slide Show tab. Let's go over the important things to know on this tab.
The first is the Record Slide Show button. That button actually has a top and a bottom to it. If you click on the top half (the stopwatch icon), your narration will automatically start from the first slide in your slide show. That's useful when you are doing your first recording for that PPT, just click and go. The bottom half (the words Record Slide Show) brings up an option to start from either the first slide or from the current slide. You will want to use that when (and I mean when, not if...trust me), you goober up your recording and you need to start over on a given slide. Rather than start over from the beginning, you can just start on the slide you choked on. You also use the bottom half when you have completed your entire recording and you decide you want to change the recording on just one slide. Maybe it sounded fine as you were recording it, but when you play it back, you realize you left something out or there was some extra background noise on one slide. Using Record from current slide lets you record that one slide without changing the narration or timings of any other slides. Either way, make sure that Play Narrations, Use Timings, and Show Media Controls are all checked on.
The Record Slide Show pop-up window will appear. Again, make sure the Slide and animation timings and narrations and laser pointer options are both checked on. Take a deep breath, and click Start Recording.
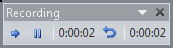
Your PowerPoint will automatically go into Slide Show mode, and the Recording controls will appear in the upper left window (you only see them while you are recording; they don't appear in your final version). The first arrow is the record arrow; you only need that if you pause your recording and you want to start it again. You can use the next button to pause your recording to take a break without actually exiting the recording process; pressing the play arrow will start it again.
There are two timers on the Recording controls. The one on the left is the timer for the slide you are currently narrating, while the timer on the right is the overall length of the narration up to that point. These will help you keep to Tip #2 from Part 1 of Narrating PowerPoints, Keep It Short. Remember your overall narration should be less than 10 minutes; the narration for any one slide should be less than one minute - closer to 30 seconds would be better. If you stick to one point per slide though, it isn't hard to keep it short.
Note: Why 30 seconds? Because that's the duration of short term memory. If you go much longer that that, your viewers will have forgotten what you said at the beginning of the slide by the time you get to the end!
Use your mouse (wheel or left mouse button) to move through you animations and transitions from slide to slide. Remember to pause very briefly at the end of one slide before moving on to the next one to avoid cutting off your narrations. If you don't make any mistakes, you can keep narrating until you get to the end, and PowerPoint will automatically end your SlideShow and return you to the Slide Sorter view in PowerPoint (note that this can take several seconds once your done, since it is saving all of your narrations).
What do you do if you make a mistake? You have a few options:
You can press ESC to exit the recording completely and go back to the Slide Sorter view (again, this might take several seconds to happen; as long as the timers have stopped increasing your recording has stopped). You can start your recording over from the slide you stopped on.
You can soldier on and come back later to re-record the slide you made a mistake on.
You can click the Reset button, which is between the two timers on the recordings controls. That pauses the recording, and resets the slide to the start of its animations. Just click Resume recording, and start narrating that slide over.
The first couple of times you narrate, you might be more comfortable with the first option. It gives you a minute to catch your breath, get a drink of water, and regroup. The more confident you get, you'll want to try option 2, but eventually you will be able to use option 3 like a pro.
You can preview your narrated slide show by clicking on either the From Beginning or From Current Slide button on the Start Slide Show panel. Make sure you go through your entire narration and make a note of any slides you want to re-record. When you are done previewing your narration, go back to you Normal PowerPoint view.
To re-record one slide or a series of slides, make sure the first slide you want to record is selected and appears in the large center area of you PowerPoint window. Click on the bottom half of the Record Slide Show button (the words, not the picture), and then select Start Recording from the current slide. If you want to record just one slide, click the ESC button when you are done recording without advancing to the next slide. If you are doing a series, just advance through them like you did with the original recording, and press ESC when you're done. Just remember it takes a few seconds for PowerPoint to get you back to the slide sorter view.
Saving as a Video
Once you're happy with your recording, you are ready to save it as a video. Click the file tab, and then Save and Send. Choose Create Video and make sure Use Recorded Timings and Narrations is selected. Then click the Create Video button.
The Save As window appears, where you can change the name of video (it defaults to the name of the PPT file) and pick the save location. The only video format PowerPoint will save as is Windows Media Video (WMV) so you can't change the file type. When you have that all set, click the Save button.
Again, it may take awhile for PowerPoint to start the video conversion process, but once it does, you will see this message at the bottom of the your PowerPoint window.
It can take several minutes for PowerPoint to convert and save your video; the longer your narration, the longer this process takes.
Once you have the WMV file, I recommend that you upload it to YouTube to share it with your students, either in PowerPoint or in the classroom. While there are other ways you could play a WMV file, putting it in YouTube is the easiewst way to make sure it is available when and where you and your student need it. Check out my YouTube post for more information on how to do that.
Narrating PowerPoints is really very easy there days. You can start and stop your narration at any point in the presentation, and even rerecord individual slides if you make a mistake. Then you save it as a movie and upload to YouTube, and you've added a personalized touch to your online course. Insert your video into a discussion thread or make it part of an assignment, and you have added some interaction to your course, as well.
The real skill comes in building a PowerPoint that is engaging enough for a narration. Remember you are making a video when you are narrating a PowerPoint, so you should think in visual terms, not textual. Also, when something moves, it catches your attention - in fact, anything that changes focuses your attention. By making animated, rather than static PowerPoints, you will be better able to keep your students engaged in learning.
Here are my tips for designing a more visually engaging PowerPoint.
People have a tendency to put too much text on their PowerPoint slides. This is particularly problematic for narrated PPTs, because people's reading rates are generally much faster than your speaking rate. They can also attend to only one thing at a time. If you have a text heavy slide, people are either going to read the slide and not listen to your narration, or they are going to listen to your narration and not listen to the slide. Either way, something is lost.
This is s typical, text-only, static PPT slide. It isn't bad, since there isn't a lot of text on it, but it isn't great for a PPT video. In cognitive psychology, there is a concept called dual-channel processing, where you use sounds (your narration) and images (your PPT slide) to provide the same information in two different ways, and the processing of that dual form of information causes deeper learning. If your PPT is just text, you are losing that image channel.
How to use that channel? Try using images that support your narration instead of text. In this case, we're really describing the process for creating a narrated PPT, starting with the design, then adding narration, and finally save as a video. In PPT, you can show a process as an image using SmartArt. Here is the same information presented in a process SmartArt:
That's a little better, but it's still static. We can ungroup the SmartArt elements, and then add animations to each element, plus a little WordArt at the beginning to come up with this.
Now we have some motion in an image that supports the idea of a process to designing and narrating and engaging PPT video. Much better than the text-only version, but you can get even more creative. In this case, I added a clip art of a computer screen as the background to my image, changed the format of the SmartArt, ungrouped the elements, modified the colors and the 3D effects, and then added similar animation as in my first animation, but now it just looks more like a video.
This animated image supports the visual channel of communication while my narration supports the auditory channel, and learners are more likely to understand the process behind creating an effective PPT narration.
Now, I'm no PowerPoint expert. I have used it for years, but everything I know I taught myself. I have some basic knowledge, like knowing that SmartArt and WordArt exists, and that you can group and ungroup objects, but everything else I did on that slide was trial and error. I just played around with different effects until I got to something I was happy with. It takes time, but now the next time I want to do something similar, I'll already know what I can and can't do. You have to be willing to play around a little to do something new.
You don't want to narrate an entire 50 minute lecture! No one will watch a narrated PPT for that long, no matter how good it is. Stick to one topic and keep it short, no more than 10 minutes. Remember, you are supporting what students have learned from the textbook, not repeating it. You are better off doing two or short videos and give students something with each one (like a discussion or an assignment) rather than doing one long video with no guided viewing purpose. it is easier to promote active learning with shorter videos as well, rather than one long one.
So that's one topic per video, nothing more. For example, if I were creating videos for a lesson on the information processing model of memory, I might do one as an introduction, one covering sensory memory, one covering short-term or working memory, one covering long-term memory, and then one that traces an example through the entire model. That's five videos, and each would be no more than five minutes long, but they are focused and sequential, and I can follow up each with a few questions each student must answer in an assignment, or a discussion after viewing all five. They are more likely to watch five short videos than one long one, and the addition of an assignment or a discussion promotes active learning.
In addition to keeping it short, keep to one point per slide. Each of my "tips" here are actually images from a PowerPoint I created for the live Teach Me Tuesday session. The "traditional" text-based method might list all five points on one slide, with selective reveals as I discuss them. but that pulls focus from the point I want to make. If I'm talking about "One point per slide" I don't want to distract you from that by including anything else on the slide. Using images for dual channel processing helps you keep to only one point per slide, as well. Information processing theory says people can only attend to one thing at a time, so help your students focus on what's important by keeping to one point per slide.
I've seen a lot of publisher PowerPoints in my day, and that vast majority of them are very bad. They tend to be text heavy, with images pulled straight from the textbook, and no animation. They do make a good outline of a textbook chapter, though, and that's how I use them in my online classes. I save them as a PPT handout PDF and tell my student to use them to take notes as they read the textbook. If you're going to take the time to narrate your PPTs, take the time to make your own. Don't duplicate what's in the textbook; expand on the important points or add new information the textbook lacks. Make use of the animation techniques in PowerPoint and use images and text for dual channel processing, and you will get much better results for your
Here's an example from the publisher PPTs for my astronomy course. This is the slide explaining what parallax is:
So many things wrong with this... The image is straight out of the textbook, so it's just a duplication of effort to use it in a narration. It would be better to use a different, active image. There is also way too much text on the slide. While it might be a good outline of the chapter content, it would pull focus from what I'm trying to explain in my narration.
I can easily create an animated slide explaining the same thing:
By using the animation effects, the image now is more active, and appears as a step by step process I can describe rather than as a complete photo where I have to try to get them to focus on one aspect.
Here's another example:
Same problems, just twice as much! Again, the images are from the textbook, they're static, and they are too hard to read! Here is the animated version, where I make use of the PowerPoint pen tool during narration:
By making my own animated image, I can focus on the concepts that I want students to understand. Since this is a descriptive astronomy course, that means dropping out most of the math, and leaving just the simple inverse relationship at the end. Then I can embed my narrated PPT about parallax into a discussion and ask some important questions in a group discussion, like will the parallax be bigger or smaller for more distance stars, and if the smallest angle of motion we can measure is about 0.05 degrees, then what is the distance of the furthest star we can measure by this method. Then that will lead into the next topic of measuring greater distances - which would be covered by a new PPT, using the keep it short tip and sticking to one topic per PPT.
(Actually, in looking at this now, I could make it even better by removing the first Earth position and arrow when I'm done with them, but leave the ink mark showing the apparent star position. Then I can focus on the parallax angle...creativity is an iterative process!)
Now that you have your well-designed PowerPoint, you're ready to start narrating...well, almost. I'll cover that process in my next post and give you some tips for narrating your PowerPoint.
This past spring, I took a great MOOC from Adobe called Digital Storytelling. We created engaging short videos or web pages using several mobile apps available on your iOS device for free from Adobe. Some of those apps are now available in web-based versions at http://spark.adobe.com. You can sign up for a free account at that website, or use your existing Adobe account.
The app I enjoyed the most was Adobe Voice, which is now called Spark Video. With Spark Video, you can combine images, text, and icons into pre-designed layouts and themes, and add you own narration to make short, engaging videos. Here's the very first one I ever made (downloaded from Spark and saved to YouTube):
Since that first attempt, I've used Spark Video a lot more, and I've learned a few more things that I think make my videos a little better. I use it now in each of my online classes to do a video overview of the week's work, to help learners focus on the important content as they study. Here's is an example from my PSY 102 class:
In the future, I want to have students in my online courses create their own videos for project-based learning. People learn better if they construct their own knowledge and produce something in the process, and Spark video would be a quick and easy way for them to construct an interesting project and something different than the usual written assignment. For example, in psychology, students could choose a mental disorder and create a video describing the symptoms and treatment of it. In astronomy, they could create a video about different classes of objects in the solar system. It's a great way to foster creative thinking in our students and to encourage those higher order thinking skills.
Keep your video short. When I track analytics for my videos on YouTube, students rarely watch more than 3 minutes! In Spark Video, if you keep your narration under 10 seconds for each slide, that's 30 slides - that's quite a few. So don't go for movie length videos with Spark Video; you can say an awful lot in just a couple of minutes of well-designed images and narration.
This is the process I generally follow when creating a Spark Video:
Develop a brief outline, indicating what content I want on each slide
Decide whether the slide will contain an image I have or one I will search for, an icon, or text
Add "things" (icon, photo, or text) to slides, picking appropriate layouts
Apply a theme and doublecheck all slides
Narrate my video
Add music and adjust timings
Preview my video and make final changes
I find spending a little time getting organized up front saves time in the long run. Once I have completed the video, I download it to my computer and upload it to YouTube for inclusion in my online courses. I write about the advantage of using YouTube and how to do that here.
When you log into the Spark web site, you access your project page. Click the plus sign to start a new project. You will go to a page with three choices: Post, Page, and Video.
Post allows you to create a new image from an existing image and text you add, while Page helps you create dynamic web pages with images, text, and links and no knowledge of HTML. We're going to look at Video. To start a new Spark Video project, click on the plus sign under Video.
The first thing you need to do is enter a title. You can change your title later on, and you can even skip this step, but a title is a good place to start. I'm calling my new video, Motivation and Behavior. Once you enter your title, click the Next button (or the Skip button if you don't want to add a title now).
Now you can choose an existing storyboard or start from scratch. Storyboards contain a series of existing slides that give you suggestions on what content to include. You don't need to follow the suggestions exactly; you can add and delete slides and move them around, but the storyboard is often a good place to start. I plan to use the Teach a Lesson storyboard, which is on the second page of storyboards. I just have to click on the right arrow near the bottom of the page to get to it.
The work space is pretty simple, but let's break it down.
Your main work area is in the center. That's where you add "things" - icons, text, or photos - into your slide. Since I picked an existing storyboard, I have hints about what type of content to add and my slides in my slide sorter have labels on them. Again, those are just suggestions; you can add whatever you want to any slide, within certain guidelines.
Icons
Icons are simple two color images that are Creative Commons licensed. You cannot add your own icons, but you can search for icons from within Spark. When you choose an icon, it takes on the color based on the theme you chose (more about themes is a bit). Icons are visually simple. so they are very useful when combined with text or photos.
Text
Text is just that - text. You don't have any formatting control over the text you include; it is all based on the theme you choose. The size defaults to whatever will fit in the text area, You can add line breaks to control where text will split from one line to the next, but everything else is under Spark Video's control. At first, I found the inability to format text limiting, but now I actually like it, because it's one less thing I need to obsess over. Spark Video will choose the best fit based on what you are doing, and it turns out that is pretty good.
Photos
In addition to your own photos, you can search from within Spark Video for any photo that has a Creative Commons license. A Creative Commons license allows you to use a photo in your project without worrying about copyright as long as you give it proper attribution - and Spark adds the attribution for you! You can also add your own photos by uploading them from your computer or by adding photos you have saved to your existing Adobe Creative Cloud or Lightroom accounts (useful if you use something like Photoshop to edit your photos) or from you Dropbox or Google Photos accounts.
Best Practice Suggestion
Searching Outside of Spark
I use search and upload most often. I search for an appropriate photo from within Spark Video first, and if I can't find what I'm looking for, I see if I can find it in the image files publishers provide to instructors. If I still don't find what I want, I try searching Wikimedia Commons for freely usable photos; however, if I use a Wikimedia image, I have to be sure to add the appropriate attribution at the end.
To add a "thing," you click on the appropriate link in the work area.
If you choose Icon, the Icon search field appears on the right. Enter the name of what you want, and then scroll through to find the icon you want to use. If you can't find one, try a different search. Once you find the icon you want, just click on it to select it, and it will appear in your work area.
When you choose Text, your cursor appears in the center of your work area. Just type the text you want to enter. As you type, Spark Video will resize the text to fit the work area, and add line breaks if there is too much text on one line. You can control where the line breaks occur by pressing the enter key to insert the break where you want it. You will notice that the Layout pane now appears on the right; we will look at that later.
Photo gives you the most choices. When you choose Photo, the Photo pane will appear on the right. Click the Upload Photo button to upload a photo you have on your computer or Find Photo to search for Creative Commons licensed images. This is also where you can link your cloud photos accounts, like Adobe's Creative Cloud, Dropbox or Google Photos.
Once you've added the photo, you can resize it and move it around. To do so, you need to access the photo options, which you can do by just clicking on the photo. In addition to zooming, the photo options allow you to change to an icon or text or change the photo itself. You can delete the photo you selected, too. If you want to change the photo or replace it with an icon or text, I recommend deleting the photo first, and then entering the new text or selecting a new icon or photo.
If you select Zoom, the Zoom dialogue (Zoom in or Zoom out) will appear either to the left or the right of your work space. Zooming in makes the photo bigger, up to the default area defined by Spark for the photo, while zooming out makes it smaller. If you zoom in on your photo, you can then move the photo around so you can choose the area of the enlarged photo will appear in the default Spark area.
Using Your Slide Sorter
Sometimes you may find you have an extra slide you don't or you want to move the slides you have into a new order. You use your slide sorter to do that.
To delete or duplicate a slide, click on the thumbnail of the slide you want to select. A menu button will appear in the upper right corner of that thumbnail. Click the menu button to access the menu, and then either duplicate or delete.
You can also reorder your slides using the slide sorter. Just click and drag a slide into its new position.
The default layout is "One Thing" which is a rectangular area in the middle of the slide, with a small amount of the background visible around it. While that's often appropriate, there are several other layouts available.
In addition to One Thing, you can have Two Things side by side. You can also have a Thing with a text caption below it. You can also have a Full screen Photo, but only a photo; you can't have full screen Icons or Text. You can, however, add an Icon or Text on top of a Full Photo; the Text or Icon uses the same area as One Thing.
Again, at first I thought having just five layout options limiting, but in practice they make me focus on content rather than appearance. Sure, once in a while I'd like to do three Things, or two Things on a full Photo, but I so far I've been able to make these work. Anything more, and the video loses the power of simplicity.
You can apply a layout either before or after you add your "Things" - or both. If you choose your layout after you enter your "Things," Spark Video will keep adjust the placement of your Things. For example, if you add Text to a One Thing Layout, when you change to Two Things, the text will appear in the left Thing box. If you start with Full Photo and Thing, and enter text on top of your photo, that text will disappear if you change to just Full Photo, but it will reappear in the caption if you change to Thing + Caption and back on top of you photo if if you go back to Thing + Full Photo. The key is you can try different layouts without losing the work you have done.
Once you are happy with your photos, icons, and text, it's time to add narrations. you narrate each slide individually, and you can narrate each one over and over until you are happy with the result. To narrate, of course, you must have a microphone hooked up to your computer. The first time you narrate, Spark may ask permission to access your microphone; just click through the dialog boxes to give permission.
To start the narration, click the orange microphone button at the bottom of your work area and talk! Spark Video keeps track of the time and even tells you if you're talking too much. After about 10 secs, the Keep it short message will appear; of course, you can make your narration as long as you want, but if it is too long, you will lose your student's attention. When you have finished your narration for a slide, you can preview it by clicking the arrow to the left of the narration button. This will play your narration for that slide only, along with any music you have chosen.
Best Practice Suggestion
Doing Better Narrations
I find it easier to build my Spark Video on the web site, and then narrate on my iPhone. Unfortunately, Spark is not yet available for Android devices, but you can always narrate on the Spark web site. However you narrate, either on the web site or your iOS devices, I have a few recommendations to make your narration the best it can be:
Stick to one device: I found that when I narrated some on my iPhone, some on my iPad, and some online, there was a different tonal quality to each device. You can hear that in the first video I did about the New Horizons mission.
Pause before and after you speak: When you are narrating, click the narrate button, and wait just a fraction of a second before talking. You want to see the timer start to go above the narrate button. When you are done talking, wait another fraction of a second before letting go of the narrate button. You don't need to wait long; just long enough to think about waiting. But that will help prevent cutting off the beginning or end of your narration. Again, you can hear that in the first video I did.
Talk at a normal rate: Forget everything you've read about talking slowly for presentations. Just talk at your normal rate of speed. Again, these are meant to be short, engaging videos, and if your narration is too ponderous, students won't pay attention.
Be animated: Don't be afraid to have a little fun! Put some expression in your voice and avoid talking in a monotone. While you want to talk at a normal rate, you might want to exaggerate your tone to make your narration a little more interesting.
Spark Video has about 30 themes for you to choose from. The theme sets the background of your slides (unless you choose a Full Photo layout; in that case no background if visible), as well as the color of your text and icons. The theme also set the font size and type of your text. Just click Themes in the upper right to bring up the Themes pane, then scroll through the themes to find one you like. Click on the theme preview in the Themes pane to apply it to your video. You can reapply additional themes as many times as you want, but you can only have one active theme. You also cannot edit the themes or create your own.
Best Practice Suggestion
Picking Themes
Be sure to preview your video after you choose a theme; some of the themes can crop out parts of your images (like Watercolor!) or the colors may not complement your photos (Ginger?).
Spark has several simple melodies for you to use as background music. To change the music, you click on the Music link in the upper right to bring up the Music pane. There you can scroll through and select the tune you would like to use. You can also choose to use no music by clicking the slider button at the top Music pane to turn music off. To upload your own music (please do not use copyrighted music without permission), click the Add My Music button.
To preview a tune, put your cursor on the name of the tune, and a play button will appear to its left. Click the play to preview the tune; click the stop button to stop the preview. To select a tune, click on its name, and a check will appear to the left of its name, indicating that is the one you are using. You can adjust the volume of the music with the slider at the top of the Music pane.
Best Practice Suggestion
Using Music
Watch the audio levels if you add your own music. The Spark music choices all have a uniform volume, but commercial music often varies in volume. What may sound great at the beginning may become tooo loud or too soft later in your video.
I did a video about the Jovian planets and added a symphony movement called Jupiter as the music. It starts off soft, but builds quickly, and if I hadn't previewed the the entire video, I wouldn't have known my narrations were being drowned out by the music!
Previewing Your Video
To preview your entire video (and not just your current slide), you can click the Preview button to the left of your slide sorter your work area.
Your preview will open up, hiding your Spark work area. You will be able to see all transitions, hear your narrations as well as your background music, and decide if you need to make any changes. When you are done previewing, click the X in the upper right corner of the preview window to go back to your work area.
Spark saves your work as you go along and when you return to your projects page, so there is no save button. To publish or download your completed video, you can click the Share button at the top of the screen. When you do that, the Share window opens up:
Notice that the title you first entered is automatically filled in. You can change it here and add a subtitle, if you want. You can pick a category if you plan to share it publicly to the Adobe Community; just click the drop-down menu to pick a category. In this case, I chose not to share my video publicly, but instead to just create a link I can send to Facebook or Twitter or paste into a webpage or email.
You can see this little video in shared format here.
Best Practice Suggestion
Using YouTube
I prefer to download my video and upload it to YouTube. This allows me to take advantage of the closed captions in YouTube and to easily embed my video into Blackboard Learn. Here is the same video on YouTube.
When you go back to your Projects page, you will see a thumbnail of your new project. You can also share your project from here, or if you click the menu button in the upper right corner, you can rename your project to change that title you entered at the beginning, you can duplicate it if you want to use the same format for a new video, you can delete it, and you can download it. You also have the option to unpublish it if you have already shared it. To edit your project, just click on the thumbnail, and you are back in Spark Video!