Tips for an Engaging Narration

OK, maybe not that animated...and I don't mean just visually. Make sure when you record your narration you put some animation in your voice as well. You should sound just a little bit goofy. It will take some getting used to, but remember that anything that changes catches someone's attention. That applies to changing the inflection of your voice as well as motion in your video. Some people suggest that you speak slower than normal, but I find that sounds forced, and you tend to lose the inflection you need to sound animated.
I do recommend writing a script, at least until you get used to recording your voice. You can put the script in the notes area of your PowerPoint slide and print out the notes to use while you narrate. Rehearse once or twice to get comfortable with using a script and to make any last minute changes, as well as to check your animations in PowerPoint.
While computers often have microphones built in, I recommend using a separate USB mike or even a microphone/headphones head set. You will get better sound quality that way, since the mike will be the correct distance for good sound quality, and it will be better able to filter out extraneous noises. Speaking of extraneous noises, if your mouse has a wheel on it, use that to transition your animations and slide changes. Using the spacebar on your keyboard or even clicking the left mouse button can make an audible click on your narration.
One thing you should know is PowerPoint records each narration for each slide separately, so you can't talk over the transition from one slide to another. You can talk over animations within slides, but not when you move from one slide to the next. If you do, you will hear a break in your narration as you move from slide to slide. To prevent that, stop talking before you transition to the next slide, pause just long enough to know you paused, and then move to the next slide. You'll avoid any loss of words that way.
Narrating in PowerPoint 2010
Now you're ready to narrate. This is the easy part!
Everything you need to create your narration is located on the Slide Show tab. Let's go over the important things to know on this tab.
 The first is the Record Slide Show button. That button actually has a top and a bottom to it. If you click on the top half (the stopwatch icon), your narration will automatically start from the first slide in your slide show. That's useful when you are doing your first recording for that PPT, just click and go. The bottom half (the words Record Slide Show) brings up an option to start from either the first slide or from the current slide. You will want to use that when (and I mean when, not if...trust me), you goober up your recording and you need to start over on a given slide. Rather than start over from the beginning, you can just start on the slide you choked on. You also use the bottom half when you have completed your entire recording and you decide you want to change the recording on just one slide. Maybe it sounded fine as you were recording it, but when you play it back, you realize you left something out or there was some extra background noise on one slide. Using Record from current slide lets you record that one slide without changing the narration or timings of any other slides. Either way, make sure that Play Narrations, Use Timings, and Show Media Controls are all checked on.
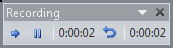 Your PowerPoint will automatically go into Slide Show mode, and the Recording controls will appear in the upper left window (you only see them while you are recording; they don't appear in your final version). The first arrow is the record arrow; you only need that if you pause your recording and you want to start it again. You can use the next button to pause your recording to take a break without actually exiting the recording process; pressing the play arrow will start it again.
There are two timers on the Recording controls. The one on the left is the timer for the slide you are currently narrating, while the timer on the right is the overall length of the narration up to that point. These will help you keep to Tip #2 from Part 1 of Narrating PowerPoints, Keep It Short. Remember your overall narration should be less than 10 minutes; the narration for any one slide should be less than one minute - closer to 30 seconds would be better. If you stick to one point per slide though, it isn't hard to keep it short.
Note: Why 30 seconds? Because that's the duration of short term memory. If you go much longer that that, your viewers will have forgotten what you said at the beginning of the slide by the time you get to the end!Use your mouse (wheel or left mouse button) to move through you animations and transitions from slide to slide. Remember to pause very briefly at the end of one slide before moving on to the next one to avoid cutting off your narrations. If you don't make any mistakes, you can keep narrating until you get to the end, and PowerPoint will automatically end your SlideShow and return you to the Slide Sorter view in PowerPoint (note that this can take several seconds once your done, since it is saving all of your narrations).
What do you do if you make a mistake? You have a few options:
- You can press ESC to exit the recording completely and go back to the Slide Sorter view (again, this might take several seconds to happen; as long as the timers have stopped increasing your recording has stopped). You can start your recording over from the slide you stopped on.
- You can soldier on and come back later to re-record the slide you made a mistake on.
- You can click the Reset button, which is between the two timers on the recordings controls. That pauses the recording, and resets the slide to the start of its animations. Just click Resume recording, and start narrating that slide over.
The first couple of times you narrate, you might be more comfortable with the first option. It gives you a minute to catch your breath, get a drink of water, and regroup. The more confident you get, you'll want to try option 2, but eventually you will be able to use option 3 like a pro.
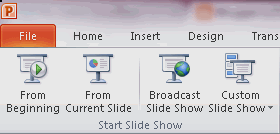 You can preview your narrated slide show by clicking on either the From Beginning or From Current Slide button on the Start Slide Show panel. Make sure you go through your entire narration and make a note of any slides you want to re-record. When you are done previewing your narration, go back to you Normal PowerPoint view.
To re-record one slide or a series of slides, make sure the first slide you want to record is selected and appears in the large center area of you PowerPoint window. Click on the bottom half of the Record Slide Show button (the words, not the picture), and then select Start Recording from the current slide. If you want to record just one slide, click the ESC button when you are done recording without advancing to the next slide. If you are doing a series, just advance through them like you did with the original recording, and press ESC when you're done. Just remember it takes a few seconds for PowerPoint to get you back to the slide sorter view.
Saving as a Video
Once you're happy with your recording, you are ready to save it as a video. Click the file tab, and then Save and Send. Choose Create Video and make sure Use Recorded Timings and Narrations is selected. Then click the Create Video button.
The Save As window appears, where you can change the name of video (it defaults to the name of the PPT file) and pick the save location. The only video format PowerPoint will save as is Windows Media Video (WMV) so you can't change the file type. When you have that all set, click the Save button.
Again, it may take awhile for PowerPoint to start the video conversion process, but once it does, you will see this message at the bottom of the your PowerPoint window.
It can take several minutes for PowerPoint to convert and save your video; the longer your narration, the longer this process takes.
Once you have the WMV file, I recommend that you upload it to YouTube to share it with your students, either in PowerPoint or in the classroom. While there are other ways you could play a WMV file, putting it in YouTube is the easiewst way to make sure it is available when and where you and your student need it. Check out my YouTube post for more information on how to do that.
No comments:
Post a Comment